Introduction #
We created all GoranGrooves Handy Grooves MIDI drum loop collections to be 100% compatible with GoranGrooves Handy Drums range of drum plugins.
Depending on the type of MIDI loop collection, its drum mapping may not be compatible with all Handy Drums default mapping. For example, World Percussion drum loops will not make sense when played on a regular drumset, such as the Rock Standard plugin.
Match the loops to the appropriate plugins to achieve the expected results. This document provides accurate information on what drum mapping a particular MIDI loop collection uses.
The Handy Grooves MIDI drum loops are provided in both type 0 and type 1 MIDI formats.
They come with installers that will automatically place them in a location that is instantly accessible from within all Handy Drums v2.0 plugins and standalone apps.
For users of 3rd party drum VI’s, ZIP archives are also provided for manual installation.
See this doc on DOWNLOAD and INSTALLATION of Handy Grooves.
Naming Conventions #
We use a variety of names and abbreviations to indicate the content of a MIDI file. To keep the length practical, we prioritize the info shown in a file name. Elements that may show up in a file name include:
- style (e.g., Shuffle, Rumba)
- type (e.g., groove, fill)
- tempo (e.g., slow, medium, fast)
- time signature (e.g., 6_8, 5_4)
- sticks vs. brushes (e.g., brsh, stck)
- feel (e.g., swing/swung, straight)
- an instrument providing the leading subdivision (e.g., hats, ride)
- subdivisions (e.g., 8’s, 16’s)
- particulars (e.g., syncopated kick)
- accents or rhythms (e.g., 2& 4, x_xx)
The most common elements of a drum groove, such as a 4/4 time signature or sticks, are generally not noted and are assumed. These naming strategies are aimed at helping you orient yourself better among the loops, but they are not a substitute for auditioning them.
MIDI Types #
As mentioned earlier, Handy Grooves come in both type 0 and type 1 MIDI formats. All of our MIDI loops contain a single track, be it in type 0 or type 1 MIDI. Most users prefer to get a single MIDI track when importing loops.
Most DAWs import type 0 MIDI as a single track since, by its nature, it can contain only one track.
We recommend using type 0 MIDI.
If, by chance, importing a type 0 MIDI results in more than a single MIDI track, you can use type 1 MIDI instead to achieve a single MIDI track upon import. Some DAWs, like Cubase, have settings on how imported MIDI loops should be treated. If you are getting unexpected results, consult your DAW’s manual.
How To Use MIDI Loops #
MIDI loops, by their nature, can not contain any sound. They are simply performance information.
For MIDI loops to generate sound, they must be connected to a sound module (virtual drum plugins) or loaded inside one.
The overall procedure consists of the following steps:
- Create or open an existing project in your DAW of choice
- Create a MIDI/ Instrument track and connect it to a virtual drum plugin
- Audition available MIDI loops and import them onto your MIDI/ Instrument track
- Edit the MIDI loop on your track before duplication
- Duplicate the edited MIDI loop as many times as needed
The exact procedure for creating tracks and loading virtual instruments varies from DAW to DAW.
This resource will provide you with the exact procedure for achieving that in your DAW of choice.
Audition and Import MIDI Loops Into DAW Project Using MIDI Loop Browser #
Very few DAWs (Cubase and Studio One) offer the essential function of previewing MIDI loops prior to importing them into your project. To overcome this major shortcoming of majority of DAWs, we recommend using Handy Drums’ MIDI Loop Browser for this purpose.
Beginning with Handy Drums v2.0, all plugins and standalone apps come with a built-in MIDI Loop Browser. This allows you to browse and audition any drum loops on your system inside any DAW.
You can import any desired MIDI loops into your project by simply dragging them from the dedicated panel onto your MIDI or Instrument track.
In addition to previewing and importing MIDI loops, the functionality can also bookmark any folders or loops for quick access. It can also sync tempo and playback controls with your DAW and allows you to play MIDI files inside Handy Drums without the need for a DAW.
The dedicated document covers the MIDI Loop Browser in detail. Make sure to read it to fully take advantage of its capabilities.
If you are not using our MIDI Loop Browser to preview and import MIDI loops into your project, you can simply drag and drop MIDI loops from your computer browser onto your MIDI/ instrument track.
MIDI Track Settings #
Set the track to “musical mode“ #
For an imported MIDI loop to conform to your project’s tempo (and any subsequent tempo changes), the MIDI/ Instrument track on which it is imported must be set to MUSICAL mode.
If the track on which you are trying to drop a MIDI file has a time base set to linear, as opposed to musical, then the imported MIDI file may automatically create a new “Musical” MIDI track.
To avoid this, set the time base of the target track to Musical before dropping a MIDI file onto it.
Tip: You may layer all imported MIDI events onto a single MIDI track, and they will play back as one.
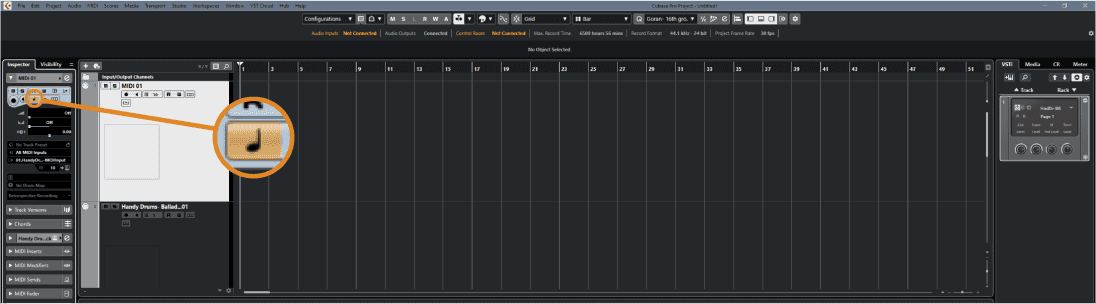
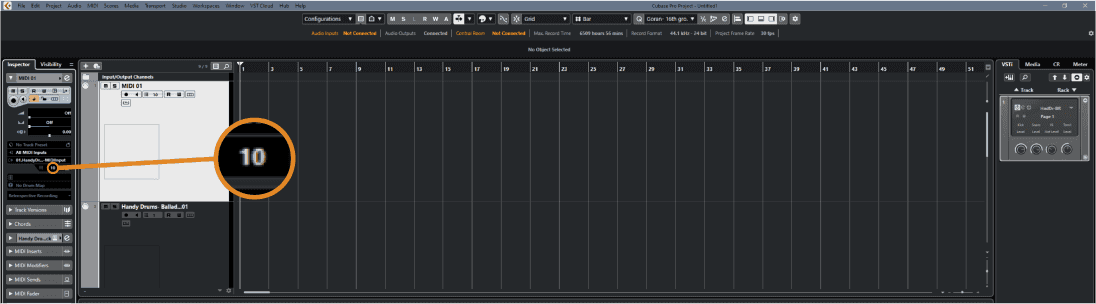
Set the MIDI track channel to 10. #
Set Drum Map #
Select the GM drum map or, for more accurate results, the relevant GoranGrooves customized drum map.
If in Cubase, we recommend downloading our customized drum maps and importing them for the most accurate drum mapping references. For other DAW’s you can create your own custom drum maps by referring to our drum mapping references.
Learn How To Create Full-Length Drum Tracks Using MIDI Loops
Auditioning MIDI Loops Using Cubase’s Loop Browser #
Alternatively, in Cubase, you can also preview MIDI loops and drag them into your project using Cubase’s built-in MediaBay, Loop Browser, or Sound Browser.
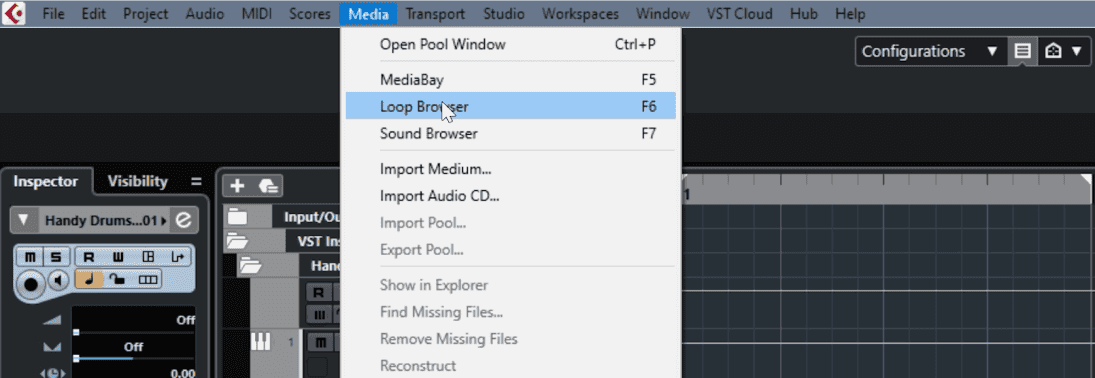
Open Loop Browser #
Open The Loop Browser or MediaBay or Sound Browser from the Media menu in the header.
Index GoranGrooves Handy Grooves Directory #
In the left panel of the window, browse to the folder containing the GoranGrooves Handy Grooves MIDI loops you want to audition and make sure it is selected. Cubase will take a few moments to index it. Once ready, the contents of the sub-folders can be further browsed and auditioned.
Browse through the sub-folders to locate the loops you want to audition.
Connect Loop Browser Output To VST Rack Instrument #
Before you can hear anything, you need to load the appropriate Handy Drums plugin into your VST Rack and connect the Loop Browser to it.
Audition MIDI Loops #
Once the plugin is loaded and connected to the Loop Browser, you can click on any MIDI loop to play it through the plugin.
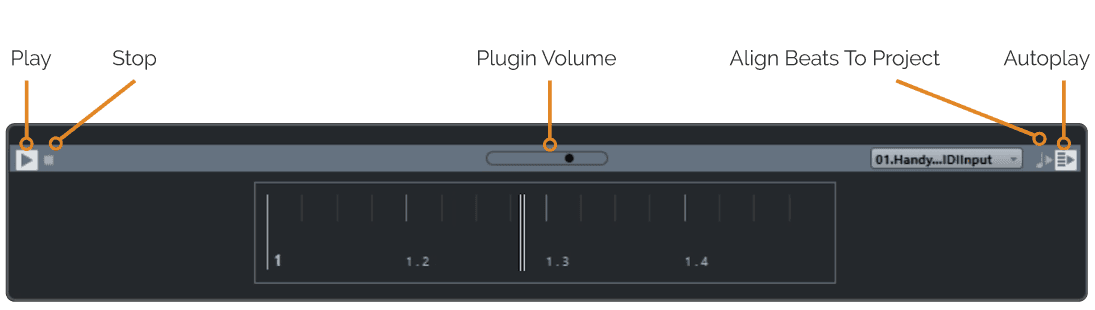
Loop Browser Controls #
To automatically play any loop you click on, make sure the autoplay button is on. Otherwise, press the play button after selecting a MIDI loop.
MIDI loops will play at their default tempo. If you wish to audition them at the tempo of your current project, enable the “Align Beats To Project” button.
Learn How To Create Full-Length Drum Tracks Using MIDI Loops