Introduction #
Whether you are an expert drum programmer or a complete beginner, quality pre-made MIDI drum loops can save you a lot of time and be a source of inspiration. This tutorial will introduce you to the basics and teach you to put together a complete drum track for a song.
Handy Grooves MIDI drum loops contain the following elements, which we will look into more detail:
- Rhythmic patterns
- Instrumentation
- Microdynamics
- Groove Timing
To get started and if you haven’t already done so, please first familiarize yourself with how to import MIDI drum loops.
The basic concept of using MIDI drum loops is to drop them onto a MIDI track connected to a VST drum plugin, duplicate it as many times as needed, and play.
Editing An Existing MIDI Drum Loop #
Before replicating a short drum loop into a full-length drum track, it is best to ensure that the loop works well for the song part. We can do several things to an existing MIDI drum loop ever so slightly to alter it or change it beyond recognition.
Rhythmic Pattern- Adding or Removing Notes From a Groove #
Adding a single note (like a kick drum) or removing one can profoundly affect the drum pattern. By altering its rhythmic pattern, it essentially becomes a new groove.

The exact procedure may vary slightly depending on the DAW you are using, but the principle is the same. To remove a note from a drum loop, click on it with the pen tool or select it and hit “delete” on your keyboard.
You can remove several notes at once by first selecting them with the selection tool.
Use the pen tool and click on the appropriate spot in the drum editor grid to add a note.
Instrumentation- Moving a Note To Different Drum #
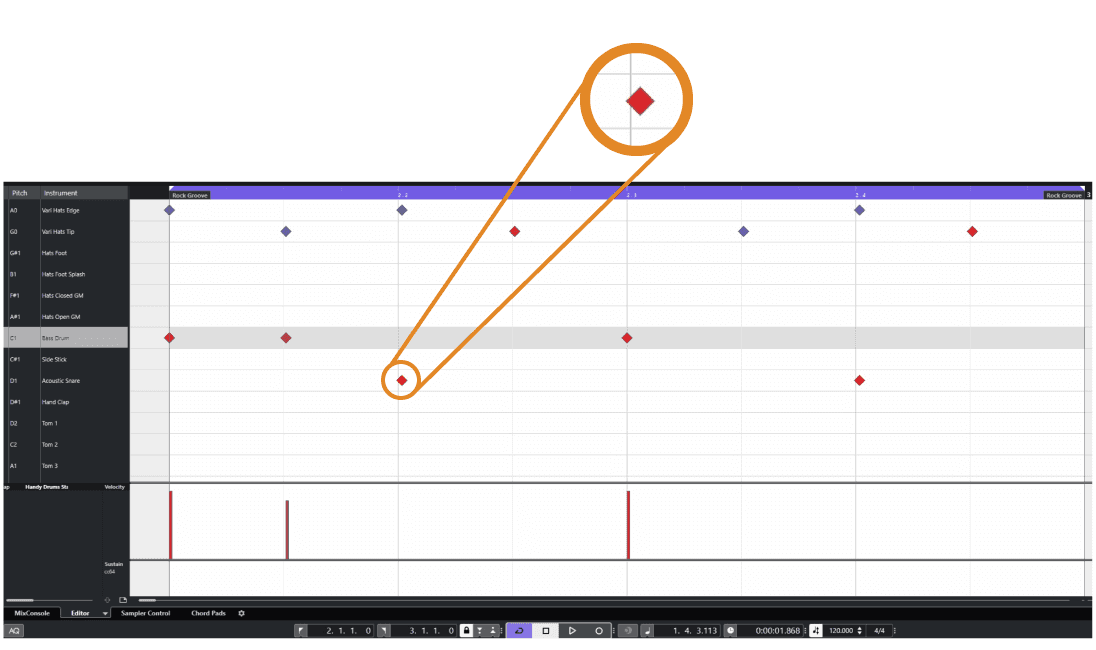
Suppose we have a simple groove with the snare on beats 2 & 4, and we want to have them played on a Tom 1 instead. It is easiest to shift them to the desired instrument to maintain the same velocity and timing for those notes.
Select the snare notes (on C1) using the selection tool and then move the notes to the desired drum (Tom 1 on D2) using the up/down arrows on your computer keyboard.
Use the same technique to move other elements such as hi-hats to a ride cymbal.
Microdynamics #
Changing the velocities of individual drum notes can profoundly alter the overall effect a groove has on a listener, for better or worse. A drum note of higher velocity doesn’t just sound louder. As velocity is increased, several elements of the drum sound change. Timbre changes, decay is shortened, attack increases, and there is a slight pitch band as a drum head is stretched from the stick strike. Our ear can easily tell a difference whether a drum was hit hard or soft even if all samples were played at the same loudness.
Suppose we have a simple Hard Rock drum groove that we want to morph into a groove more suitable for Soft Rock. We can achieve that by lowering the velocities of individual notes. Remember that all of the components of the groove (hats, kick, snare) need to remain in balance with one another to sound right, so we’ll want to adjust them all.
We can do that by selecting all notes in the drum loop and using one of the several techniques available in your DAW to simultaneously scale down the velocities.
Note: Because the original velocities of individual elements vary greatly, some notes will require additional adjustments to make them sound right. For example, ghost notes may become inaudible and will need to be brought back up. Let your ears be the judge.
Steinberg’s Cubase has some great features for note velocities that enable us to scale them proportionally.
Expert Tip: Whenever you have a pickup note played on the kick drum, the main note on the downbeat should be strong, while the pickup note should be much lighter.
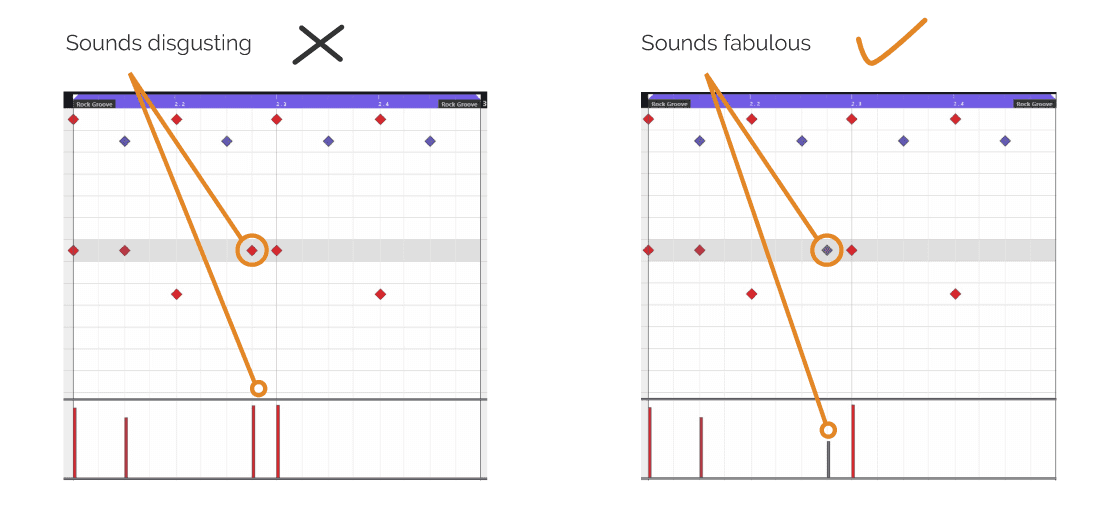
If two notes are played on kick drum starting on the downbeat, the first note (on the downbeat) should be a stronger note out of the two.
Changing Accents
Accenting some notes while ghosting others is what makes a drum beat sound and feel good. We can substantially change the feel of a groove by changing the accents. Accents act as sort of goalposts, and they spell out a rhythm, while the ghost notes serve as connecting dots.
By lowering the velocities of accented notes, you can essentially remove the accents. Likewise, increasing velocities on individual notes will accent them.
Expert Tip: While accenting downbeats provides a solid feel to a groove, accenting upbeats generates a more forward motion feel.
Groove Timing #
There are three aspects of timing that dictate how a listener perceives a drum groove.
They are:
- subdivisions
- feel
- micro timing
Subdivisions #
Subdivisions divide the main beats in a musical bar and give an overall “feeling” of how “busy” a drum groove is. They provide groove flow and forward motion to music.
A typical 4/4 groove has four quarter beats in the bar. Each of these beats can further be divided into eight notes (“eights”), sixteenth notes (“sixteenths”), and so on.
When editing an existing MIDI drum loop, ensure that your grid is set to the correct resolution. Your grid should match the smallest subdivision found in your drum loop (e.g., 16th notes).
Feel #
When we talk about feel, we think of the two most common types: straight and swing (or triplet feel).
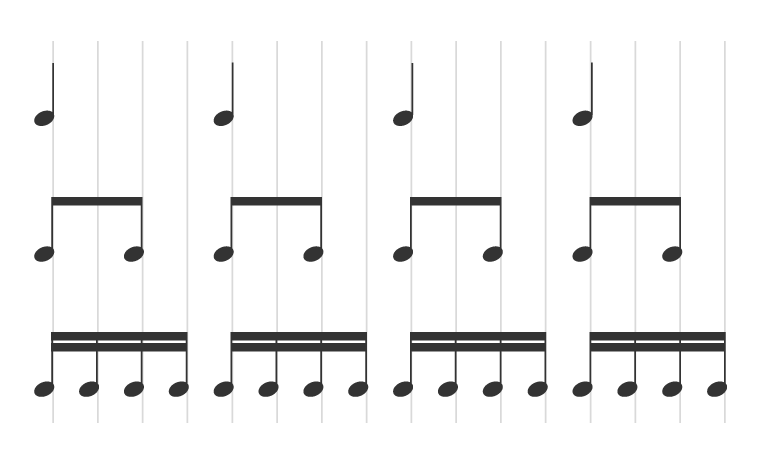
We achieve the straight feel by simply subdividing the beat into 2, 4, 8, 16.
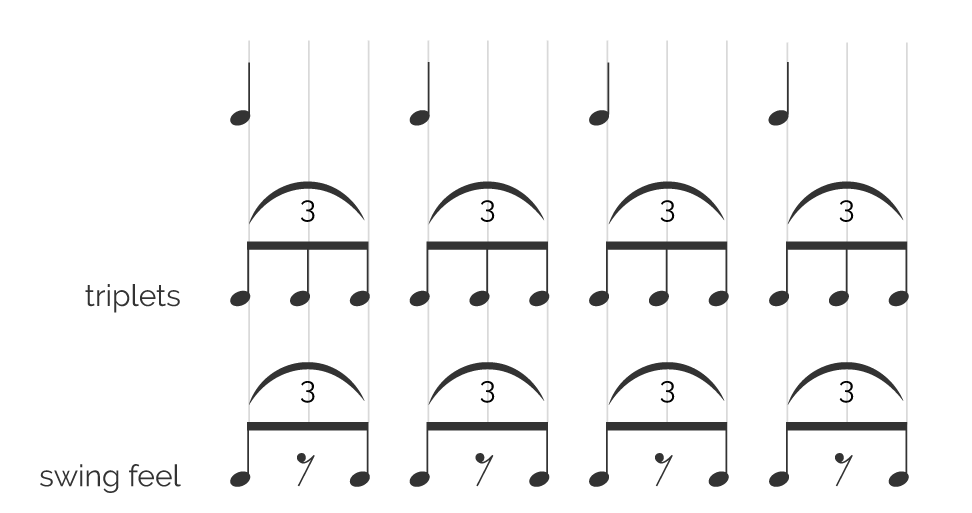
The swing feel is based on triplets. Rather than subdividing the main beat by two, it is subdivided by 3. Usually, the second note of a triplet is omitted, and only the first and third notes are played. That creates a “swing” or “swung” feel.
When deciding to manipulate an existing groove, any added notes must match the current feel. Otherwise, it may sound as if the drummer’s limbs are arguing as opposed to working together.
IMPORTANT: Make sure to select the appropriate triplet grid when working with swung grooves.
Equally important is that you pick a drum loop whose feel matches that of other instruments in your song.
Expert Tip: While mathematically speaking, these “feels” can be obtained by perfectly subdividing the beat, those subdivisions are rarely played perfectly in real life. Instead, the straight feel may be swung slightly, while the swing feel may be stretched or compressed towards the straight feel. There are many variations to explore, which can make them more suitable for particular musical situations.
There is also a particular feel (of a third kind) in Brazilian and Latin American music that is neither straight nor swung but lies in between.
Micro timing #
When we talk about “grid” in musical production, we usually think of something that resembles notebooks we used in math classes at school.
All DAW’s equipped with MIDI editing functionalities will provide such grids to adjust the subdivisions by increasing the number of vertical lines.
However, programming drum beats to such grids will result in a robotic, unnatural feel with no human character. Even the most extraordinary human drummers don’t play grooves exactly to this mathematical grid in real life. Instead, they slightly delay or rush certain beats to make the groove “sit in the pocket.”
Those slight timing differences make a groove of a particular drummer feel different from the groove of another.
For example, snare drum hits on 2 and 4 may fall slightly behind the mathematical beats. At the same time, the drummer may play kick exactly on the downbeats.
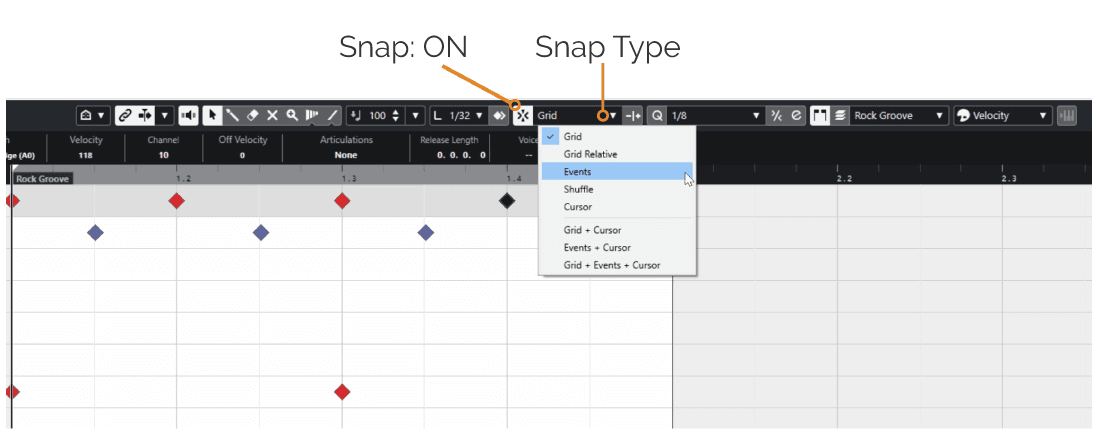
IMPORTANT: When adding notes to an existing drum loop with a human, non-mathematical, micro timing, the new notes must be aligned to the current notes and not the mathematical grid. Otherwise, you’ll get undesired flamming between components (e.g., kick and hats).

Expert Tip: Depending on your DAW, you should have an option to “snap notes to events” as opposed to “snap notes to the grid.” This will help you perfectly align new notes to the existing ones, keeping the original feel intact.
Another great solution is to generate a groove template from an existing drum loop. You can then display a grid that is not mathematically perfect but follows the timing and groove of the original drum loop.
That makes manipulation of existing loops much easier.
Combining MIDI Drum Loops And Fills Into A Full-Length Drum Track #
Drum fills are generally used to mark song sections, such as going from verse to a chorus, or for a dramatic effect.
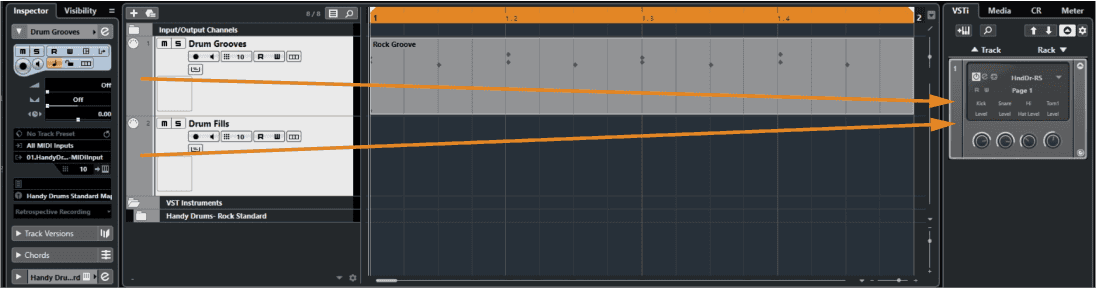
When combining drum loops with drum fills, it is best to work on two MIDI tracks: one for the loops and the other for the fills. That will enable us to adjust fills’ durations and in and out points non-destructively.
If using two MIDI tracks, make sure they are both routed to the same VST rack instrument.
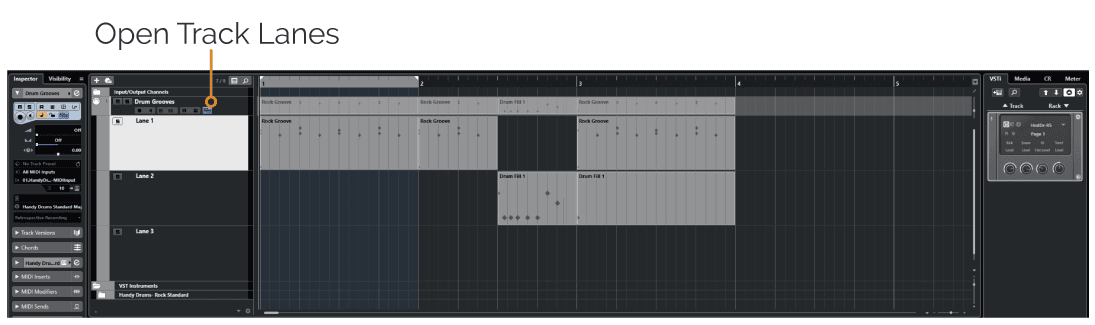
As an alternative, if your DAW offers it, you can use track lanes within the same MIDI track to equal effect.
Duplicate The Drum Loop For The Duration Of The Song #
Select the main drum loop we have previously prepared and duplicate it as many times as needed to complete the song length on MIDI drum track 1. If you are using several drum loops throughout the song, copy them accordingly.
Tip: You can either copy+paste the MIDI loops or “duplicate selected.” In Cubase, I use ctrl+D to duplicate the selected part quickly.
Add Drum Fills #
Once you have created the main drum track, add the desired drum fills in appropriate spots in your song to the MIDI drum track 2. A drum fill will often play in the last bar of a musical phrase or a section and end on beat 1 of the superseding bar.
Trim The Main Loop and Fills #
The concept of a drum fill is that it replaces the main drum groove for the duration it is played. Trim the bar end of the main drum beat in portion over the drum fill. Listen to the results. The two should not play on top of each other, and neither should there be a gap between them. Instead, they should seamlessly transition from one to the other.
If you want to shorten the duration of the drum fill, trim the beginning of it and extend the length of the main loop so that it matches the beginning of the fill.
Expert Tip: Whenever a drummer ends a drum fill on a crash cymbal, she does not play a hi-hat or ride at the same time. Therefore, when combining a drum fill with the main drum loop, make sure to remove any hi-hat or ride cymbal notes on beats that contain the crash cymbals. It will instantly make it sound more natural.
Remember that it takes the drummer time to bring her arm from a crash cymbal back to the main time-keeper, so you may also want to delete any hi-hat/ride note immediately following the crash cymbal. More realism!
If you end a song with a crash cymbal, you likely also want to double it with the kick drum at the same time.
Adding Spice #
Now that the entire drum track is composed of pre-existing MIDI drum loops and fills, we can add subtle variations.
If the main drum part is played on the variable hi-hat, we can “loosen” the closed hats just a tad in places. Doing so will create a more realistic performance. For this to work, you must be using one of GoranGrooves Handy Drums plugins.
Set the main MIDI drum track to record, set the mod wheel on your MIDI controller to CC4, and hit record. Your mod wheel should be all the way up (127). Move the mod wheel down occasionally until you hear the hats start sounding looser, then bring the mod wheel back up.
For detailed information on variable hi-hats in Handy Drums plugins, see this doc.
All Handy Drums instruments alternate between drum samples in a round-robin fashion. Even a consistent drum loop will sound ever so slightly different with every subsequent drum hit.