- INTRODUCTION
- GUI MAIN OVERVIEW
- MAIN MIXER PANEL
- VIRTUAL KEYBOARD PANEL
- MIDI LOOP BROWSER
- KEY (DRUM) MAPPING/ PITCH-TUNING PANEL
- PRESET MANAGER
- CLICKABLE URL TO GORANGROOVES LIBRARY
- OUTPUT ROUTING
- SETTINGS PANEL
- UI Zoom Factor
- Clear MIDI CC
- Change Sample Folder Location- button
- Sample Library Location
- Driver *
- Audio Device *
- Output Channel *
- Buffer Size *
- Sample Rate *
- Streaming Mode *
- Load Samples: on Demand/ Load All
- GM Hats to Vari Hats Converter
- E-drummer mode
- MIDI Channels
- MIDI Device List *
- Variable Hats animated icon
- Incoming CC# and Value Panel
- Variable Hats Controller Curve (CC4)
- Modifying CC4 input sent from drum modules
- ABOUT
- ZOOM FACTOR BUTTON
- HIDDEN FEATURES
INTRODUCTION #
What are Handy Drums? #
Handy Drums are virtual drum instruments. They can be used as plugins inside DAWs or as standalone apps. Think of Handy Drums primarily as sound modules that can be played live using a MIDI controller or by routing MIDI loops into them. They are the software equivalent of acoustic drums and percussion instruments and, as such, require a “performer” to play them (either a human being or MIDI loops).
We designed Handy Drums to be straightforward to use and to give you a beautiful, produced, finished drum sound right from the get-go.
Basic Features #
While most of the functions can be viewed from the simple graphic user interface (GUI), behind the scenes are 100+ powerful individual samplers and practical algorithms working in unison to create seamless playback. Certain functionalities are also not apparent from the interface.
Most Handy Drums plugins utilize a Variable Hi-Hat system, enabling you to adjust how open or closed hi-hat sounds on the fly. You accomplish that by using CC4. We cover that functionality in detail in this doc.
Most drum components (e.g., kick, snare, toms) have a linear volume response. The highest velocity value of 127 will respond to 0db on a digital scale, while the half velocity of 64 will respond to -6db. The velocity of 32 will output -12db, and so on. All velocity values in between will smoothly attenuate the volume output.
New in V2.0 #
V2.0 of Handy Drums is packed with improvements right across the board and introduces several significant new features. They sound better, look better, and are easier to use than ever before. For details on all new features, see this doc.
Handy Drums V2 come with an integrated MIDI LOOP BROWSER, a feature that completely transforms how you interact with MIDI loops inside your DAW. You can now seamlessly audition MIDI loops and drag n’ drop them right inside your DAW.
Other new and exciting features in V2 include GM to Vari Hat conversion at the click of a button, E-Drummer mode with improved snare pad zoning, even more sophisticated Vari Hats, panning options, pitch tuning, solo buttons, component sub-mixers, dynamic drum pads, additional outputs and more.
GUI MAIN OVERVIEW #

Hidden feature- Learn midi/ Assign midi ID
Hidden feature- update notification
Hidden feature- Variable hi-hats
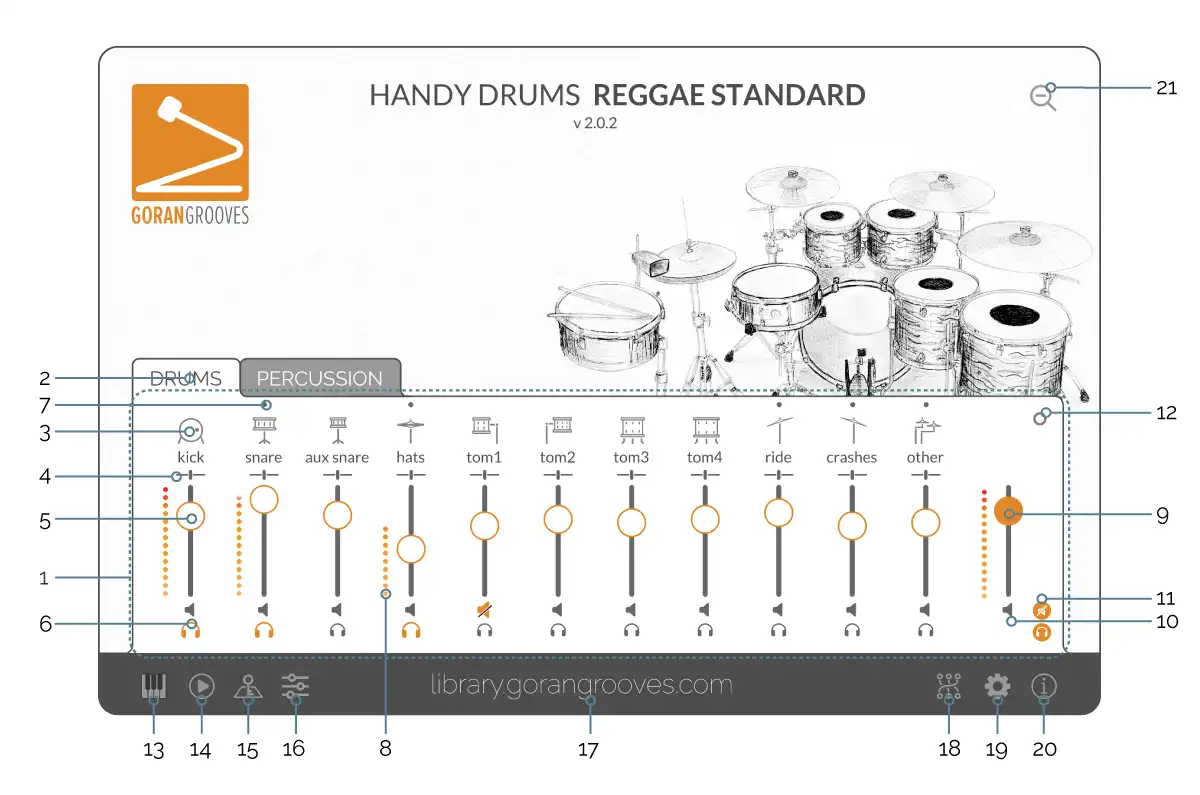
MAIN MIXER PANEL #
This panel holds the most fundamental and frequently used elements. All Handy Drums instruments, including those with a vast number of instruments (Latin Percussion & Drums, Studio Standard, World Percussion), are split into drums and percussion panels. You can switch between them by clicking on the panel tabs.
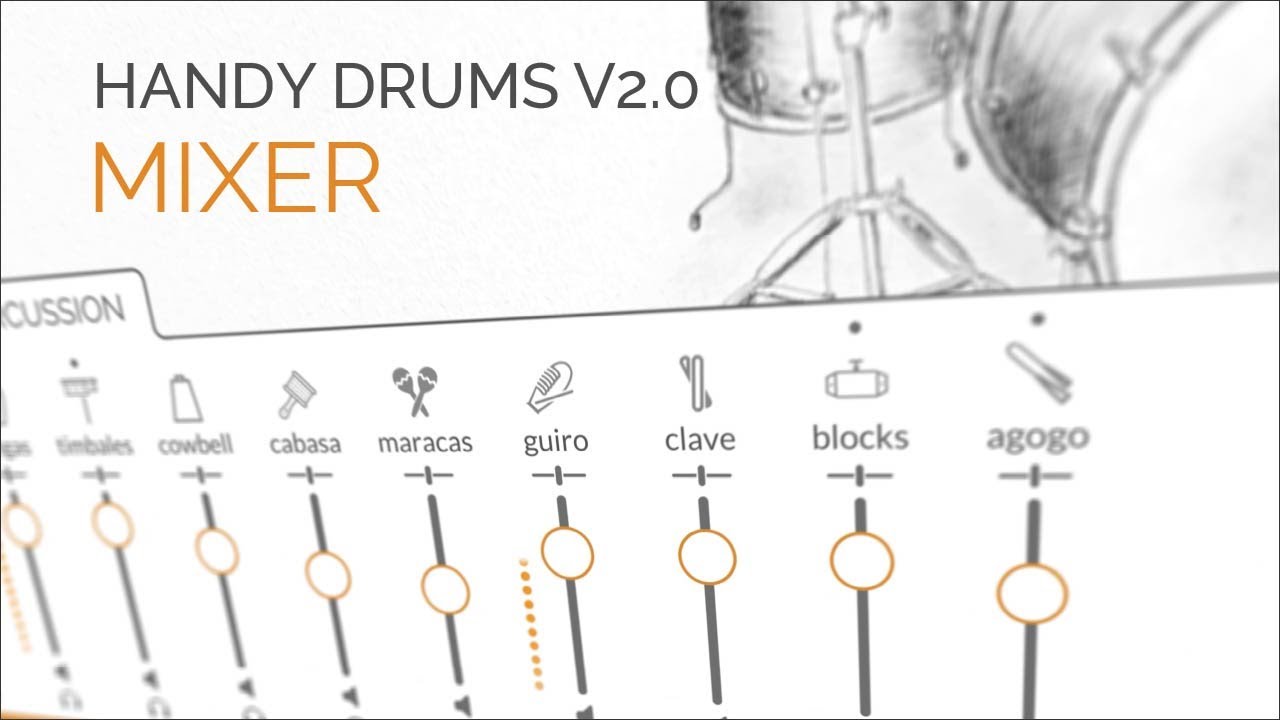
Drums / Percussion Tabs #
Every Handy Drums plugin contains several or a full suite of percussion instruments that have their dedicated group. Switch between the drums and percussion group views by using the tabs.
Instrument Audition Buttons #
Clicking on icons previews the sounds of the respective instrument components. With each mouse click, samples are re-triggered at random velocities. Since some icons represent a group of instruments (e.g., crashes, percussion), they are played consecutively with each mouse click.
Pan Controls (Panners) #
Right below each instrument name is a panner. These are combined panners in that they blend both L and R channels when panning them to one side, helping preserve the integrity of the samples. This is different from how regular panners work, where panning to one side is achieved simply by lowering the level of the opposite side.
When you hover over a panner, a “panner mode” popup box will display, enabling you to quickly swap L for R or turn the channel into a mono track.
It is important to note that all instruments found in Handy Drums are presented in a stereo image, and their default panning state is in the center. If an instrument is heard more to one side of the stereo image, it is because it was either recorded or mixed that way or a combination of both. Panning such an instrument to the opposite side will not yield the same results as the original sound. Instead, you should use the R/L panning mode to swap the L and R channels, instantly placing the instrument on the opposite side of the stereo image. To preserve the stereo integrity of the samples, we recommend keeping the panning to a minimum.
When a channel is in reverse (swap) mode, the panner will change color to orange, and the handle will switch to the opposite side if it is not in the center position. Likewise, the popup values that come up whenever a panner is engaged will be reversed so that L will show on the right side and R will show on the left side.
To turn any instrument MONO, simply select the MONO mode in the panner mode popup. The panner will turn orange, and the handle will become circular with M in the middle, indicating that it is in mono mode.
Volume Sliders #
Sliders control instrument components’ output levels. Sliders control either an individual component (kick, tom) or a component sub-group (snare/ snare cross-stick, ride/ ride bell).
The values range from 0.00 to 1.00 in 0.01 increments and are displayed once a slider is pressed or moved.
Mute and Solo Buttons #
Below the volume faders are the mono and solo buttons, laid out to allow you to determine the status of any and all channels at a glance.
The solo buttons have priority over the mute buttons, so if you engage solo while the mute button is already active, the solo button will override it and disengage the mute. However, if you press the mute button while solo is active, nothing will change, and the channel will remain soloed until you disengage the solo button.
Each time a solo or mute button is engaged, a master solo and mute indicator will appear to the right of the master fader. Pressing these indicators/buttons will disengage all active solos or mutes, respectively.
Mute and Solo Master Toggle #


These indicators appear and illuminate as soon as a Mute or Solo is activated on any channel. Clicking on the buttons disengages any active mute or solo, respectively.
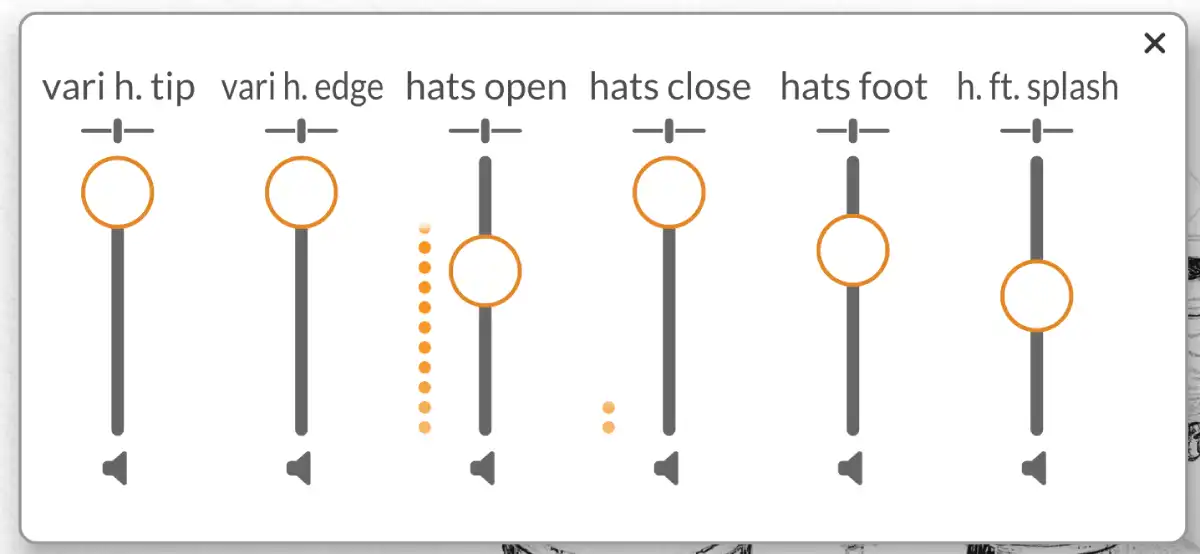
Sub Mixers #
Some instruments, such as the snare drum and hi-hat, contain several components and will have a dot above their icons. Hovering over the dots reveals that they are buttons that will display additional sub-mixers when pressed. This allows you to adjust further levels between components of a single instrument group, such as the opened and closed hi-hats.
Sub-mixers include volume faders, level indicators, panners, and mute buttons.
Gain Output Meters #
All channels, sub-groups, and the main output contain gain meters. The meters are only visible when a signal is present in their respective outputs.
Currently, the subgroup meters and the main meter will be visible only when their outputs are routed to outputs 1-2.
Master Output Slider #
This slider controls the plugin’s main output. The values range from 0.00 to 1.00 in 0.01 increments and are displayed once a slider is pressed or moved.
Master Mute Button #

This button mutes/unmutes the plugin’s master output.
Drums & Percussion Subgroups Panel (expandable) #
Clicking on the circular button at the top right corner of the mixer expands the main subgroup panel for drums and percussion. All drum components found in the drums panel are routed to the drum subchannel, and all percussion components are routed to the percussion subchannel.
The Subgroup Panel contains the volume faders, gain meters, mute and solo buttons, and routing outputs (when enabled) of drums and percussion groups.
Use these two main controls to adjust the overall balance between drums and percussion.
VIRTUAL KEYBOARD PANEL #

Pressing the keyboard button will display/hide a small virtual keyboard panel in the lower portion of the plugin.
The keyboard shows all notes occupied by the plugin and allows you to audition them. The utilized notes are marked in orange and will reflect any changes in drum mapping.
Your MIDI track needs to be set to channel 10 to see the notes you play on a MIDI controller reflected in this keyboard display. This visual feedback will only show in DAWs and not in standalone apps.
Virtual CC4 mod wheel #
Next to the virtual keyboard, you will find the virtual mod wheel connected to CC4. The modwheel will reflect any CC4 messages coming in from your DAW or a MIDI controller, used to control the openness of the variable hi-hats. You can operate the virtual mod wheel using your mouse cursor or its wheel.
You can assign any additional CC# to the variable hi-hats using this virtual mod wheel. To assign a CC# to the variable hi-hats, do one of the following:
- Right-click on the virtual mod wheel, select “Assign MIDI CC”, then pick any from the available list, or
- Right-click on the virtual mod wheel, select “Learn MIDI CC” and move a slider or a knob on your MIDI controller, instantly assigning it to the variable hats (in addition to CC4).
The animated hi-hat audition button will also display the action generated by the CC4 or any other CC assigned to the variable hi-hats.
MIDI LOOP BROWSER #

The built-in Handy Drums MIDI Loop Browser allows you to easily browse through all MIDI loops on your computer, audition any MIDI file, and insert it into your project by simply dragging it onto your DAW’s timeline.
This is a welcome addition to most DAW users who lack this functionality.
The MIDI Loop Browser is packed with features so please see a detailed overview of the MIDI Loop Browser for its full functionalities.

KEY (DRUM) MAPPING/ PITCH-TUNING PANEL #

Pressing the mapping button will open/close the key mapping panel, where you can assign any note to an instrument in several ways.
The Key (Drum) Mapping panel displays the current mapping of all individual drum and percussion components included in the plugin and allows you to assign them to different notes. It also doubles as a pitch-tuning panel for all instruments.
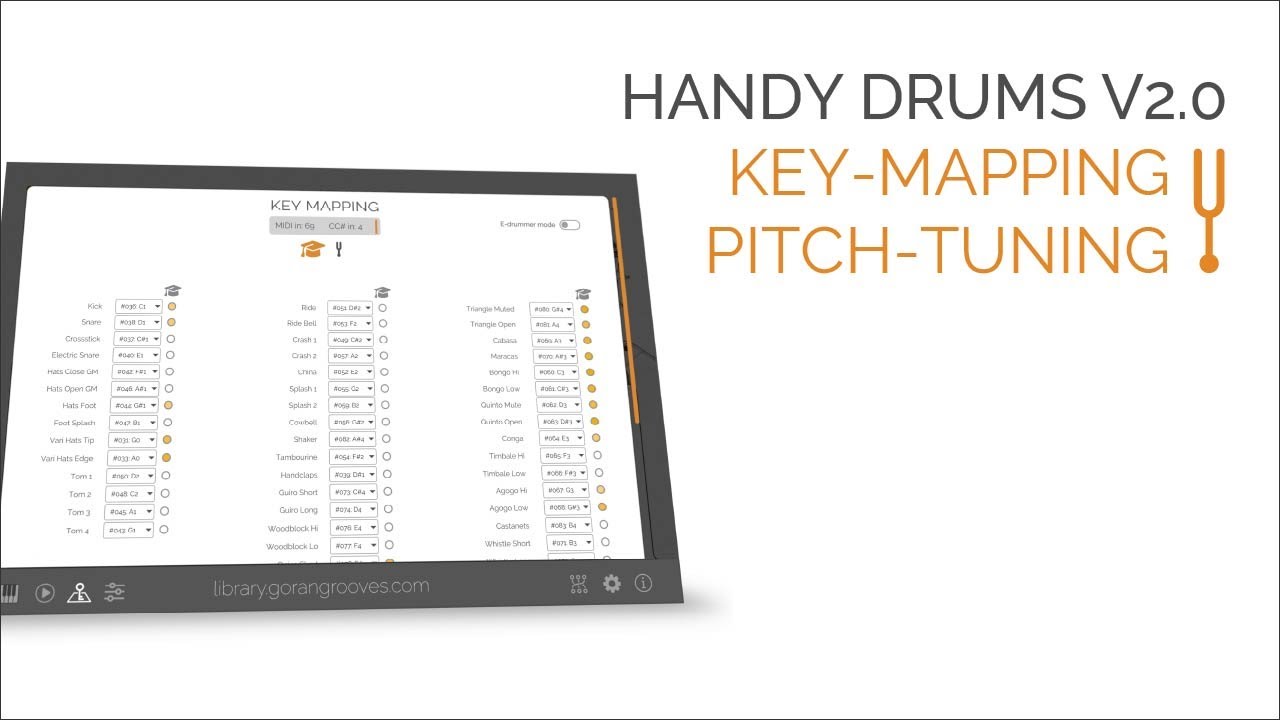
Note Indicators #
Note indicators next to each instrument mapping box illuminate orange whenever that instrument is triggered via MIDI. This helps you know what instrument is currently being played.
Assign/ Learn Note #
There are two ways to assign a drum/ percussion component to a different note:
1- click on the note box and select from the popup of all available notes or
2- Click on the learn note button next to an instrument and strike a key (either on the plugin’s virtual keyboard or a physical MIDI controller connected to the plugin). The instrument will be instantly assigned to the note/key you just played.
Blank Mapping #
Located at the bottom of the mapping panel are 16 blank mapping keys, allowing you to assign multiple keys to a single instrument. This was one of the most requested features by keyboard players who wished to play snare rolls on multiple keys. They also come with a “strike to learn” function, so assigning keys is a breeze.
To use, first pick an available instrument from the left combo box, then select a note for it in the right combo box. Alternatively, use the “strike-to-learn” functionality explained above.
If you want to start fresh, you can recall a blank preset from the Preset Manager.
Drum Pads #
Hovering over any instrument names will reveal the drum pads, and clicking on them from left to right will play the samples of that instrument at the lowest to highest velocity.
Pitch Tuning #
Clicking on the tuning fork presents you with knobs to tweak the pitch of all included instruments. You can go up or down six semitones. But remember that this is a basic pitch shifting that affects the length of the samples, so the further away you go from the original, the more drastic the change to the instrument’s character will be. Use in moderation.
E-drummer Mode switch #

The E-Drummer Mode tailors the plugin to drummers playing Handy Drums using electronic drums and it can be engaged using this toggle switch.
The switch is also accessible via the Settings panel and offers several additional settings.
MIDI in# and CC in# Display Panel #
The panel at the very top of the mapping panel will display the most recently played note, as well as CC# and its value.
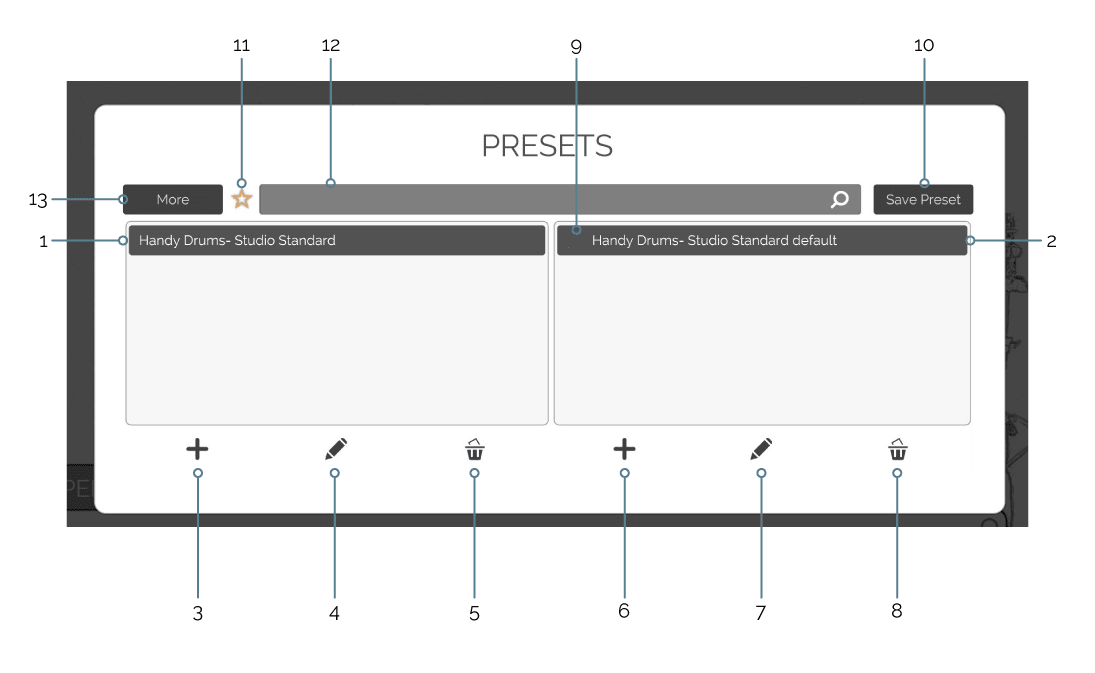
PRESET MANAGER #

Click this button when you want to speak to the manager. The Preset Manager panel will magically appear and grant you 3 wishes, such as recalling the default plugin state or saving your current setup.
The preset manager saves the plugin’s current full state. All parameters are saved at once, and they include the following:
- Drum mapping
- Output channel routing
- Volume faders (sliders)
- Mute buttons status
- Drum / Percussion Tab selection
- Bank name
- Preset name
- Create new bank
- Rename current bank
- Delete current bank
- Create new preset
- Rename current preset
- Delete current preset
- Mark preset as “favorite”
- Overwrite the selected preset with the current state of the plugin
- Show only favorite presets
- Search through available presets
- Additional preset functions
Each Handy Drums plugin comes with a single default preset, which matches the settings that load once the plugin is initialized within a DAW session or in standalone mode.
The preset manager organizes presets in banks (left column), which, when clicked, display available presets within them in the right column. Once a preset name is clicked, it is recalled instantly.
The additional preset functions:
- Show preset folder
This will open the plugin’s applications folder in your OS and select the “User presets” folder.
- Import all presets from Clipboard
Import the previously exported compressed version of your presets from another Handy Drums plugin.
- Export all presets to Clipboard
Using this function will create a compressed version of all of your presets in gibberish text on your Clipboard, which you can then import into another Handy Drums plugin.
- Import all presets as Collection
Import the previously exported .hpa presets collection from a Handy Drums plugin.
- Export all presets as Collection
This is a neat way to export all your presets into a single file, which can then be shared or imported into another Handy Drums plugin. The preset collection has a .hpa file name extension.
Note: Since the preset manager saves the entire plugin’s state, importing presets from other Handy Drums plugins can have unexpected results if the number of available instruments doesn’t match.
CLICKABLE URL TO GORANGROOVES LIBRARY #
Clicking on this link will open up your default browser and take you to GoranGrooves Library.
OUTPUT ROUTING #

This button will open/close the output routing panel for all channels/ subgroups. It will be displayed just under the volume sliders.
Each output selection corresponds to the channel/ sub-group above it. By default, all channels are routed to a single stereo output (channels 1+2). The plugin has 16 stereo outputs in total.
To route a component (e.g., snare) to a different output, click on the output box and select one of the 16 available stereo outputs.
Note: Multiple outputs are only functional when the plugin is used within a DAW. Changing the output to anything other than the “St.1” stereo pair in the standalone app will make that channel inaudible.
Enabling Plugin Multiple Outputs #
You must also enable multiple outputs for the plugin to function as intended within a DAW. Please consult your DAW’s manual on “how to enable multiple outputs on a virtual instrument.”
For your convenience, we have put together info for several DAWs.
Enable Multiple Plugin Outputs In Steinberg Cubase / Nuendo
Enable Multiple Plugin Outputs in Presonus Studio One
Enable Multiple Plugin Ouputs In Apple Logic Pro X
Enable Multiple Plugin Outputs In Image-Line FL Studio
Enable Multiple Plugin Outputs in Avid Pro Tools
Enable Multiple Plugin Outputs in Reaper
Enable Multiple Plugin Outputs in Reason
Once you enable multiple plugin outputs within your DAW, you can route various instruments inside Handy Drums to any available outputs. The change will be reflected in the plugin output channels in your DAW. This will allow you to manipulate those output groups further: automate volume and add effects, for example.
SETTINGS PANEL #

This button will show/hide the main settings panel.
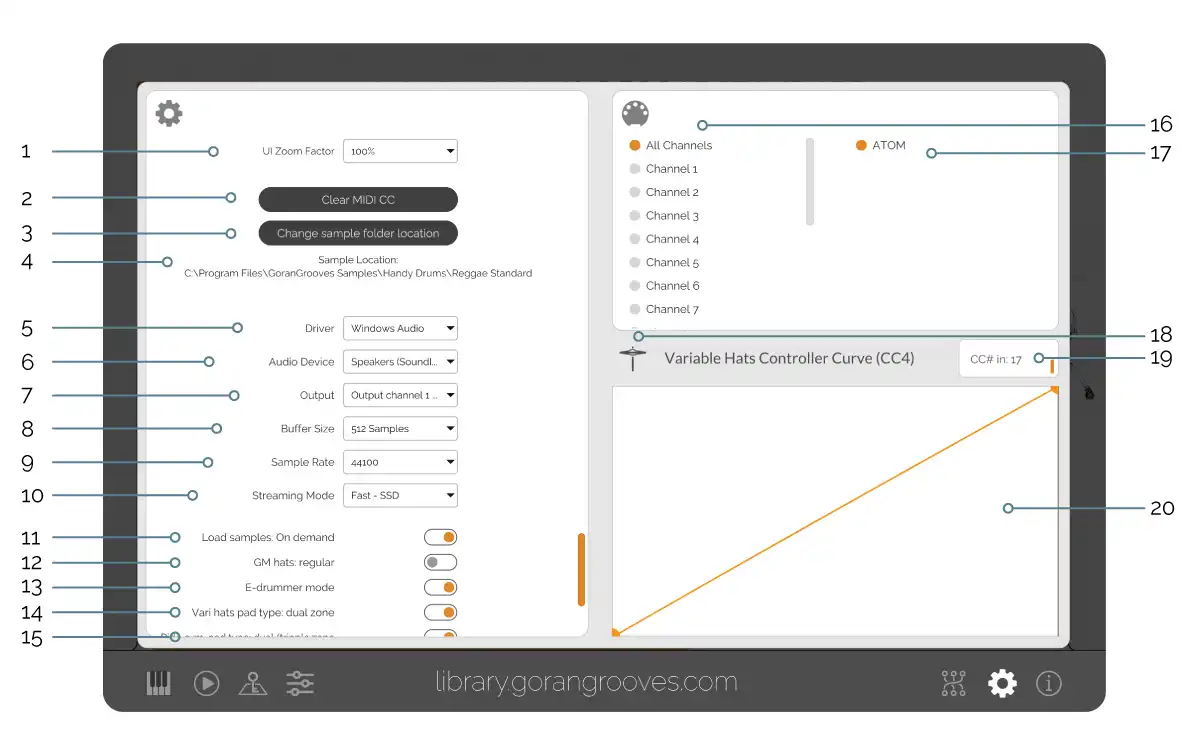
UI Zoom Factor #
This control sets the size of the plugin’s GUI. By default, the plugin is set to 100%. You can make it smaller at 50% and 75% or larger at 125% and 150%.
Clear MIDI CC #
This button clears any currently present CC messages.
Change Sample Folder Location- button #
If you didn’t manually relocate the sample library after the installation, you don’t need to touch this.
Use this button to set the folder where your sample library is located.
After you change the location, you will be prompted to reload your plugin so the changes take effect.
Sample Library Location #
This is the current location of your sample library for this plugin.
Driver * #
The audio driver protocol available on your system. We recommend the ASIO type. A different driver may yield a better result for a standalone app. Test to see what works best on your system.
Audio Device * #
This is the audio device available under your chosen driver above.
Output Channel * #
Select the audio output available from your selected Audio Device.
Buffer Size * #
A larger buffer size will reduce your computer’s CPU load but will result in increased latency. Choose the lowest possible settings where you are getting a clean audio output and steady performance.
The buffer size should be set to a multiple of 8 (eg. 64, 128 etc.) or you may get unpredictable results.
Sample Rate * #
The sample library is provided at 44.1KHz, so the recommended setting here is 44100.
Streaming Mode * #
Pick the kind of disc drive you are utilizing for the Handy Drums samples for optimum plugin performance. Available options are FAST- SSD and SLOW HDD.
* These features are only available in the standalone app. When used inside a DAW, they are not available in the plugin, as those options are set and controlled by the DAW.
Load Samples: on Demand/ Load All #
By default, Handy Drums now load the samples into memory on demand only once they are played. This allows the plugin to start faster and keeps the memory consumption to a minimum, as only the needed samples are ever loaded. Don’t worry: the samples load in the instant they are played, and if you wish to load them all at once, just toggle the relevant switch.
GM Hats to Vari Hats Converter #
Regular general MIDI drum loops can only have either closed or open hats. But in Handy Drums v2.0, with a simple button switch, you can turn those regular hi-hats into variable hi-hats, allowing you to go from tightly closed to fully open, in increments. This will breathe new life into your existing collection of GM drum loops—a unique feature found only in Handy Drums!
When enabled, the Edge and Tip notes are split by velocity. You can use the dial to tune the point at which the split happens.

E-drummer mode #
The E-Drummer Mode tailors the plugin to drummers playing Handy Drums using electronic drums, and it can be engaged using this toggle switch.

The E-Drummer Mode can also be engaged from the Key Mapping panel, and when toggled on, several things happen:
-The snare drum splits into rimshot on E1 and head on D1.
-A dedicated algorithm is engaged that enables you to play foot splashes with the action of the hi-hat foot controller.
-Additional switch “Vari Hats Pad Type” appears
-If your drum module supports only a single-zone ride, you can toggle a switch to play both the regular ride and ride bell on a single zone, depending on velocity.
NOTE: While several options are visible only once the e-drummer mode is toggled on, the settings for those options remain even if the e-drummer mode if toggled off. For example, if you set the ride cymbal pad type to a single zone, it will remain as such even after you toggle the e-drummer mode off.
Vari Hats Pad Type #
In addition to a dual-zone hi-hat pad, you can use a single-zone pad to play variable hats. When enabled, the Edge and Tip notes are split by velocity. Use the dial to tune the point at which the split happens.
This switch is only visible when E-drummer mode is enabled.
Ride Cymbal Pad Type #
Similar to the variable hi-hats, the ride cymbal bow and bell can be played with either single-zone pads or dual/triple-zone pads. If a single zone pad is selected, the ride bow/ bell sounds are differentiated by velocity levels. Lower velocity values are for bow, and higher velocity values are for bell sounds.
Use the dial to tune the point at which the split happens.
This switch is only visible when E-drummer mode is enabled.
MIDI Channels #
There are 16 available MIDI channels. Unless you have a specific reason for changing it, you can leave the setting on “All Channels.”
MIDI Device List * #
This list displays all available MIDI input devices currently present in your system. If you don’t see a device you expect, make sure that it is plugged in and switched on. You may need to restart the standalone app to recognize them.
To enable MIDI input, select the device and MIDI input from the available list.
Variable Hats animated icon #
The icon will simulate the opening and closing of the variable hi-hats only and will respond to all CC4 messages, as well as any CC controller you may have previously connected to the variable hats. You can manually operate this animated icon using your mouse cursor or its wheel.
Incoming CC# and Value Panel #
This displays the most recently used CC# and its value. It is updated in realtime. This will help you determine what CC you are playing on your MIDI controller.
Variable Hats Controller Curve (CC4) #
For drummers using e-drums only
CC4 is generally reserved for hi-hat foot controllers. This controller regulates how tightly closed or open hi-hats are played.
The curve allows you to change the response of the CC4 values sent from the e-drums module and those received by the plugin.
Some drum modules, such as Roland TD-17, support variable hi-hats. While tightly pressing the foot controller will produce an appropriate hi-hat sound on the actual drum module, the CC4 value that it sends out via MIDI output is capped at 90 (instead of 127). That means that the drum module can never produce a closed hi-hat sound in Handy Drums without additional manipulation of the CC4 values.
This curve allows you to transpose the values sent from the drum module to the correct values for the plugin. In addition to providing a workaround for Roland’s limitations, this curve can also be used to tweak the response of the hi-hat controller.
The vertical values correspond to input values, while the horizontal corresponds to output values.
In the case of TD-17, you’ll need to adjust the curve so that the maximum tight closed hats value of 90 sent from the drum module is transposed to value 127, being played by the plugin.
By default, the curve is set not to transpose the values, and this is the setting you should leave unless you require this function.
Click anywhere on the curve module to change the curve, and a nod point will be generated. You can click and drag it. To remove a nod point, right-click on it. You can also change the curve slope by right-clicking and moving your mouse cursor.
Note: This function will not change the values of your drum module being recorded onto a MIDI track in your DAW, only the playback. This is primarily useful for a live performance on e-drums.
Modifying CC4 input sent from drum modules #
If you intend to record the MIDI performance of your e-drums (which limits the output of CC4), it is better to apply a MIDI transformer on your MIDI track input in your DAW. That way, the correct values will be recorded in your MIDI track and will play back as intended in Handy Drums without having to touch the CC4 curve.
Steinberg’s Cubase comes with such a MIDI plugin. As shown in the image below, we set the Transformer to react to CC4 messages and multiply all incoming values by 1.4111. So, when a drum module sends out a CC4 value of 90, that gets multiplied by 1.4111, resulting in the value of 126.99 being recorded into the MIDI track.
ABOUT #

Clicking this button will show/hide the information about the plugin developers.
ZOOM FACTOR BUTTON #

This will open up the secondary zoom factor panel and allow you to set the size of the entire GUI. It is particularly handy if the default plugin size is greater than your screen and you cannot reach the settings panel at the bottom of the plugin.
HIDDEN FEATURES #
Variable Hi-Hats #
Handy Drums plugins feature an efficient and sophisticated implementation of the variable hi-hats function, which is not visually apparent from the GUI.
Using the CC#4 controller, you can smoothly transition from tightly closed to 100% open hi-hats, with several stages in between. Our variable hi-hats utilize only 2 notes to achieve 12 articulations at full dynamic range and multiple round robins. They provide a lifelike sound.
You can also assign any additional CC# to control the variable hats openness.
Please see this in-depth post on what it is and how to use it.
Learn MIDI CC/ Assign MIDI CC #
You can assign any MIDI CC# to some elements on the GUI, which will allow you to manipulate the controls using a MIDI controller (MIDI keyboard with sliders).
To assign a physical MIDI controller to an element on the GUI (volume slider), right-click on the element (slider) and select Learn MIDI CC. Then, move the physical slider to which you want to assign this control. The first physical controller to be moved will be immediately assigned to this element.
To unassign MIDI CC from an element, right-click on it and select Remove CC.
Alternatively, you can click on Assign MIDI CC, then pick the CC# from the popup of available choices.
Note: To control the plugin parameter with a physical MIDI controller, the midi track (routed to the plugin) needs to be recording-enabled.
Software Update Notifications #

All Handy Drums plugins contain a function to automatically check for a newer plugin version and display a notification. This check is performed quietly every time a plugin is initiated. If a new version is found, an orange bell icon will illuminate next to the routing button in the bottom panel.
Clicking on the bell icon will display a popup panel with the relevant information, including a brief description and a link to read more.
To obtain the latest version, you will need to log in to your GoranGrooves account and download it from there.